
Spring is finally here — and your deck is calling. Whether it's a few loose boards that survived winter or a full-on outdoor refresh you've been dreaming about since January, this season is your best window to get it done right. The weather is mild, the materials perform better in moderate temps, and your outdoor space will thank you all summer long.
Here are five spring deck projects that deliver real results — plus the materials that will help each one last.
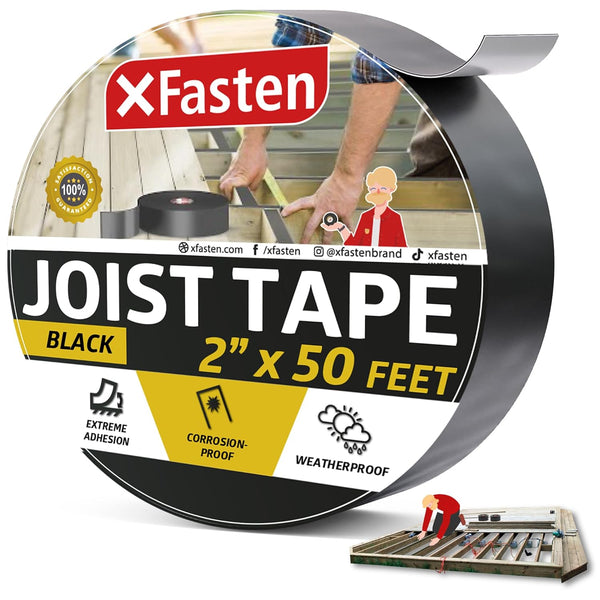
1. Reinforce Deck Framing with Butyl Joist Tape
If your deck was built more than five years ago — or if it's brand new construction — joist tape is one of the most overlooked protections you can add. Deck joists sit in direct contact with the top surface of deck boards, and that horizontal joint traps moisture every time it rains. Over time, that moisture causes rot, warping, and structural failure.
Butyl joist tape creates a waterproof barrier between the joist and the deck board, keeping that critical joint dry year-round.
How to apply it:
- Clean the top of each joist with a dry cloth to remove dust and debris.
- Starting at one end of the joist, peel back the release liner and press the tape firmly down the center of the joist, smoothing as you go.
- At corners or overlapping sections, overlap the tape by at least 2 inches to maintain a continuous seal.
- Fasten your deck boards on top as normal — screws go right through the tape.
Spring is the ideal time to apply butyl joist tape because cooler temperatures (above 40°F) allow the adhesive to cure properly without the heat-induced slipping that summer installs can cause.
XFasten Butyl Joist Tape for Decking (2"×50ft) provides a flexible, UV-resistant bond that conforms to the shape of each joist — even slightly bowed or uneven lumber — sealing out moisture before it becomes a problem.
2. Seal Deck Gaps and Flashing with Butyl Seal Tape
Where your deck meets your house — the ledger board connection — is the most moisture-vulnerable point in any deck system. Poor flashing here leads to rot inside your home's rim joist and siding. It's also one of the most common causes of deck collapse.
Butyl seal tape is the right tool for this connection because it bonds to virtually any surface (wood, metal, vinyl, concrete), remains flexible through freeze-thaw cycles, and creates a watertight seal without the cracking or peeling that caulk is prone to over time.
Spring flashing refresh — quick checklist:
- Inspect existing flashing for gaps, lifted edges, or cracked caulk.
- Remove any failing caulk or tape with a plastic scraper (avoid metal tools on flashing).
- Clean the area with rubbing alcohol and let it dry completely.
- Cut butyl seal tape to length and press firmly into place, starting at corners and working outward.
- Overlap each piece by 2 inches. Press seams firmly with a J-roller or the flat of your hand.
According to the North American Deck and Railing Association (NADRA), improper ledger connections are responsible for the majority of deck structural failures — a simple butyl seal tape refresh every few years is cheap insurance.
XFasten Butyl Seal Tape (3/4"×45ft, Black) is XFasten's top revenue product for good reason: it sticks aggressively, stays flexible in all seasons, and is easy to cut and apply without special tools.
3. Protect Your Interior Floors During the Renovation Work
Spring deck season usually means more foot traffic through your home — carrying lumber, tools, paint, concrete mix, and all the other materials that come with an outdoor project. It only takes one pass with muddy boots or a dragged sheet of plywood to scratch hardwood, scuff vinyl plank, or grind grit into grout.
Floor protection film solves this cleanly. It's a self-adhesive, low-tack film that sticks to your floor surfaces during the project and peels away without leaving adhesive residue.
Best practices for floor protection film:
- Apply the film the day before your project begins so it has time to settle and adhere.
- Overlap adjacent strips by 2–3 inches to prevent gaps at the seams.
- For high-traffic paths (doorways, hallways leading to the deck), add a second layer for extra cushion.
- When the project is done, peel back slowly at a low angle (30°–45°) — never straight up — to avoid any chance of lifting finish.
Floor protection film works on hardwood, tile, vinyl plank, laminate, and polished concrete.
XFasten Floor Protection Film (24"×200ft, 3mil) is thick enough to handle tool drops and heavy foot traffic while the low-tack adhesive leaves zero residue on finished surfaces.
4. Do a Full Deck Hardware and Fastener Check
Spring is the right time to do a full walk-through of your deck's hardware: joist hangers, post bases, ledger bolts, and deck board fasteners. Winter's freeze-thaw cycles can loosen fasteners, and any rust or corrosion you catch now is easier (and cheaper) to fix than the structural damage it leads to later.
What to look for:
- Popped screws or nails: any deck board fastener standing proud of the surface is a tripping hazard and means the board has moved. Replace with a longer fastener or use a composite decking screw for a stronger re-bite.
- Rust streaking on joist hangers or post bases: surface rust is cosmetic; widespread pitting means the connector has lost structural integrity and should be replaced.
- Loose ledger bolts: try to wiggle the ledger board. Any movement means the bolts need to be tightened or replaced with larger diameter hardware.
A good rule of thumb: if your deck is 10 or more years old, have it inspected by a licensed contractor before the summer entertaining season begins. The International Association of Certified Home Inspectors (InterNACHI) recommends deck inspections every 2–3 years for decks under 10 feet of height, and annually for elevated decks.
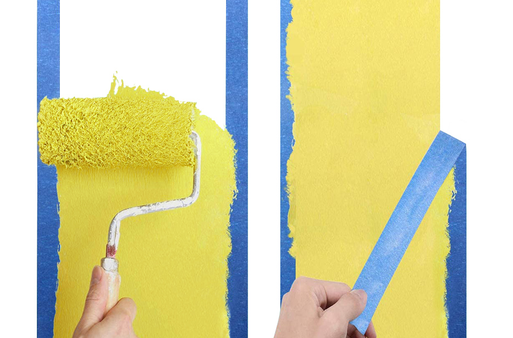
5. Refresh Deck Railings and Trim with a Clean Paint Job
A fresh coat of paint or stain on your deck railings does more than make them look good — it seals the wood grain against moisture and UV damage, extending the life of the lumber by years. Spring is ideal for this because mild temperatures (50°F–75°F) give most deck stains and paints their optimal cure time.
Before you pick up a brush:
- Use blue painter's tape to mask off any areas you want to keep clean: the house siding along the railing connection, post bases sitting on concrete, and any trim or fascia that meets the railing posts.
- Apply tape firmly, pressing down the edge with a putty knife to prevent paint bleed.
- For clean removal, peel the tape at a 45° angle while the paint is still slightly tacky (not fully dry) — this gives the cleanest line.
Painter's tape is especially useful on curved railing profiles and lattice work, where cutting in by hand would be slow and messy.
XFasten Blue Painter's Tape is designed to release cleanly from wood, metal, and vinyl surfaces without tearing or leaving residue — even if you leave it on for several days during a multi-coat project.
The Bottom Line: Build It Right While the Weather Is on Your Side
Spring gives you a short, valuable window when temperatures are moderate, rain is manageable, and your outdoor space is ready to be brought back to life. Whether you're tackling a structural fix like joist tape or flashing, protecting your home during the work, or putting a fresh face on weathered railings, the right materials make the difference between a project that lasts one season and one that lasts a decade.
Start with the foundation: XFasten Butyl Joist Tape and Butyl Seal Tape to lock out moisture at the most critical joints. Protect your indoor floors with XFasten Floor Protection Film while you work. And finish strong with XFasten Blue Painter's Tape for crisp, clean paint lines on every railing and trim piece.
Your deck will be ready for every backyard moment this summer — and the summers after that.


Comments
1 Comment
<p>Good day to you all in this site, my name is Maris Paul I want to write about my great Doc who put the smile on my face again I was just hopeless when my family doctor told me there is no cure to this sickness HSV2, this horrible sickness really stress me out anytime I have outbreak well I very happy to have a normal life again since I meet DR.AFRID who pull me out from this bondage, I was searching for cure in the internet when I found out about this doctor on a lady post that she was cured by him, I email him for help also and explain everything to him, then I was told by him there is cure to HSV 2 and I was so happy deep inside my heart, I requested for medicine that was how he sent it down to me with UPS and I have the cure within 4day, I only take the herbal medicine for just 2 week according to the doc instructed, after everything I book for appointment for test I was so happy when I have my result I was completely cured that is why I am writing this out for people to know there is cure to this sickness you can also email the doctor through DRAFRIDHERBALHOME@GMAIL.COM or visit His website to know more https://afred-natural-recipe.b12sites.com/index#home</p>